Menu:
Table of Contents
- How to connect to the BeagleBone
- How to start an ssh session with the BeagleBone
- How to upload code to the BeagleBone from Pycharm
- How to run code on the BeagleBone
- How to download results from the BeagleBone
- How to share internet with the BeagleBone via USB on Windows
- How to connect the BeagleBone to a WiFi Hotspot
How to connect to the BeagleBone
-
Power on the BeagleBone
-
Connect to the BeagleBone. This can be done by:
a. Plugging in a micro-USB cable to the BeagleBone
OR
b. Connecting to the BeagleBone WiFi access point. Depending on which BeagleBone you are using you will see one of the following access points:
    BBB1 SSID = BeagleBone-63C9

    BBB2 SSID = BeagleBone-132D
How to start an ssh session with the BeagleBone
-
Start an ssh session
a. If you connected using USB connect to 192.168.7.2
b. If you connected using WiFi connect to 192.168.8.1
Finally enter the details to connect:
Username: debian
Password: temppwd
Port: 22
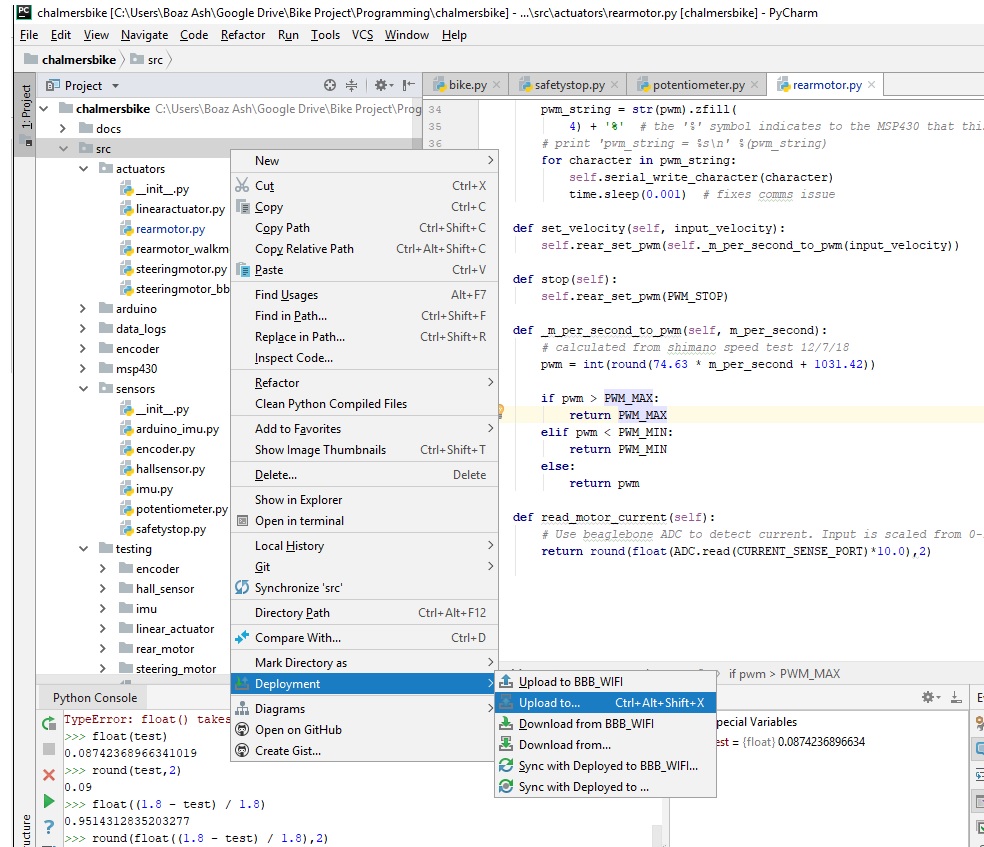
How to upload code to the BeagleBone from Pycharm
- You will need to ensure that Pycharm is configured to connect to the BeaglBone. If this has not been done please follow these instructions:
Navigate to Tools -> Deployment -> Configuration
For a WiFi connection:
Under the Connection Tab:
SFTP Host: 192.168.8.1
Port: 22
Root path: /home/debian
User name: debian
Password: temppwd
Under the Mapings Tab:
Deployment path on server: /chalmersbike
For a USB connection:
Under the Connection Tab:
SFTP Host: 192.168.7.2
Port: 22
Root path: /home/debian
User name: debian
Password: temppwd
Under the Mapings Tab:
Deployment path on server: /chalmersbike
- In the Project view window of Pycharm (normally on the left), right click on the
srcfolder.
Select Deployment --> Upload To and select the appropriate BeagleBone configuration. This will upload all of the modified and new files to the Beaglebone.
How to run code on the BeagleBone
-
Start an ssh session with the BeagleBone
-
This guide will assume that the login script executed properly and that your terminal is starting from the ‘virtual environment’ and you are in the
srcfolder. This can be verified by checking that your terminal cursor is preceded by something resembling:(chalmersbike-zI2YTWPT) debian@beaglebone:~/chalmersbike/src$where
(chalmersbike-zI2YTWPT)is the virtual environmentdebian@beagleboneis the user and device name~/chalmersbike/srcis the current folder
If this is not the case, please see the instructions on how to manually enter a virtualenv
-
Navigate to the folder containing your code:
cd foldercontainingcode -
Run script
bash script:
./myscript.shpython script:
python myscript.py
Example: we have a testing script in the testing/rear_motor folder
cd testing/rear_motor

python rear_motor.py
How to debug code on the Beaglebone
If you want to test a new module or manually set a motor speed or manually read bike velocity:
- Navigate to the
srcfolder
cd ~/chalmersbike/src
- Open python or bpython
pythonorbpython
- Import the bike class
from bike import Bike
- Instantiate the class
bike = Bike()
This will automatically open the bike in debugging mode.
- Run your command
For example, if you want to check the velocity:
bike.get_velocity()
If you want to set the longitudinal velocity:
bike.rear_motor.set_velocity(2)Sets the rear motor to 2m/s
If you want to measure the lean angle:
bike.get_imu_data()
- When you are finished, you should exit python. You do this by pressing
CTRL + D
How to download results from the BeagleBone
In Pycharm:
-
Select the following from the menu:
View -> Tool Windows -> Remote Host -
On the right hand side of the screen you will see the Remote Host window. Navigate to the folder where your results are saved. This will likely be in a subfolder of
chalmersbike/src/
NOTE: You may need to press the refresh button for your files to appear
-
Right click on the file you are interested in and select
Download from here -
On the left hand side of the screen are the local files on your computer. Find the local folder that corresponds to the folder where you downloaded the file from in the Remote Host window.
-
(Optional) It is best if you move the file out of the git project folders and do data analysis eleswhere. The easiest way to do this is to right click on the file and select
Show in Explorer. Then you can move the file to your folder of choice.
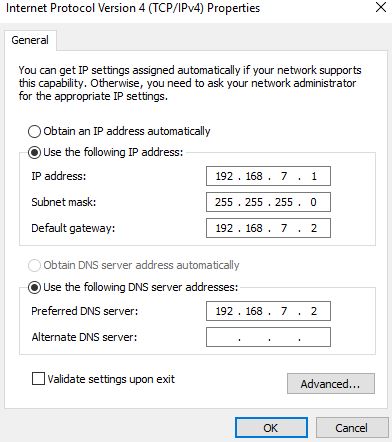
How to share internet with the BeagleBone via USB on Windows
-
Plug the micro-USB cable into the BeagleBone
-
Open Network Connections in the control panel.
Alternatively enter this into the run window:
ncpa.cpl -
Right click on the BeagleBone network adaptor and choose
Properties. The correct adaptor can be identified by its device name, look for:Linux USB Ethernet/RNDIS Gadget
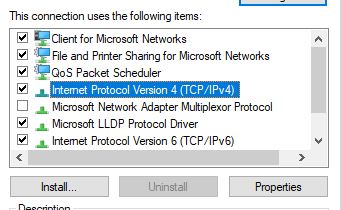
- Modify the settings so they match this image and press OK.
-
Close the Properties window
-
Right click on your primary network adaptor and choose
Properties. -
Select the
Sharingtab and modify the settings so they match this image and press OK. If prompted to change the IP of the Beaglebone, press Yes. You may have to repeat step 4 to get it working.
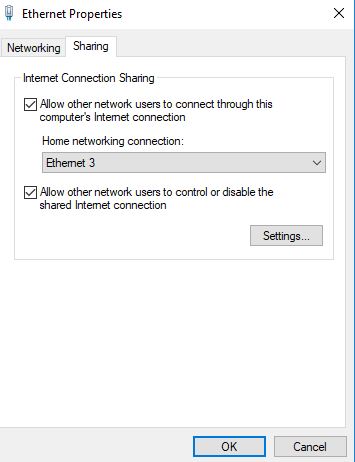
- SSH into the Beaglebone and run the script
usb_internet.shlocated in the root directory of this repo.
How to connect the BeagleBone to a WiFi Hotspot
After you have started a WiFi hotspot within range of the Beaglebone, you can connect to it as follows:
sudo connmanctl
Enter password temppwd
scan wifi
agent on
services
You should now see your access point listed, for example, my access point appears as BOAZ_WIFI2 wifi_f45eab3f63c6_424f415a5f5749464932_managed_psk
For this example, I need to run the following command
connect wifi_f45eab3f63c6_424f415a5f5749464932_managed_psk
Then you will need to enter the password for the access point
You should see a confirmation that says Connected wifi_f45eab3f63c6_424f415a5f5749464932_managed_psk
You can also verify that you are online by typing: services again. You should see AO to the left of the accesspoint name.
More info:
The symbols in the output above are: ‘*’ favorite (saved) network, ‘A’ autoconnectable, ‘O’ online and ‘R’ ready. If no letter is shown in the O/R column, the network is not connected. In addition, temporary states include ‘a’ for association, ‘c’ configuration and ‘d’ disconnecting. When any of these three letters are showing, the network is in the process of connecting or disconnecting.
https://wiki.archlinux.org/index.php/ConnMan
https://01.org/connman/documentation